Let’s be honest. 3D printing is AWESOME.
You get to create something new, customize and make anything you want or need, and even start up a small business. Dare we say, the possibilities are endless!
To do that, however, you gotta have a superb build plate and we got one just for you: the G10 3D printer build plate!
In this article, we will be walking you through how to install it and give you some maintenance tips so that your 3D printer stays in great condition. But first, let’s have a quick recap on what 3D printing is and why it’s so popular!

About 3D Printing
As you might already know, 3D printing is the process of creating a physical object from a three-dimensional digital prototype and layering a specific type of material in sequence. With the available technology, any individual is able to print simple and complex objects in various sizes. 3D printing has become quite popular over the past few years because 3D printing has made manufacturing accessible to more people.
Here are a few reasons why the 3D printing market is growing:
- Save time and overhead cost
- Print-on-demand
- Design and produce quickly
- Prototyping
- Minimal wastage
When you get into 3D printing, you can create something out of nothing. Other than that, you can make anything you need and customize them to your needs and preferences. All in your own space and pace. Doesn’t that sound amazing?
Now, to make this happen, you gotta find the best materials and equipment.
Knowing what to use and how to use it will help you get good quality and durable prints with accurate measurements. One of the things you don’t wanna miss out on is the G10 3D printer build plate.

What is G10 and Why is it Better Than Other Types?
The G in G10 stands for Garolite. It’s a composite material made by curing fiberglass and epoxy under high pressure. The reason why it’s gained popularity is because it solves one pestering problem for every user: challenging print removal.
This G10 build plate is 2mm thick and it’s enough to stay straight and sturdy at work, but allows a light flex for easier print removal once it has cooled down. It’s compatible with several filaments like PLA, PETG, and rPET, but it’s best used for nylon.
Isn’t it so cool?
Read more here: Everything You Need To Know About G10
.JPG/:/rs=w:1280)
How to Safely Prepare and Install the G10 3D Printer Build Plate
If you’re not familiar with how to use this build plate, we got you! Here are 6 easy steps on how to safely prepare and install the G10 3D printer build plate:
1. Unpack the build plate.
Lay a soft cloth on the table and remove the build plate from its packaging.
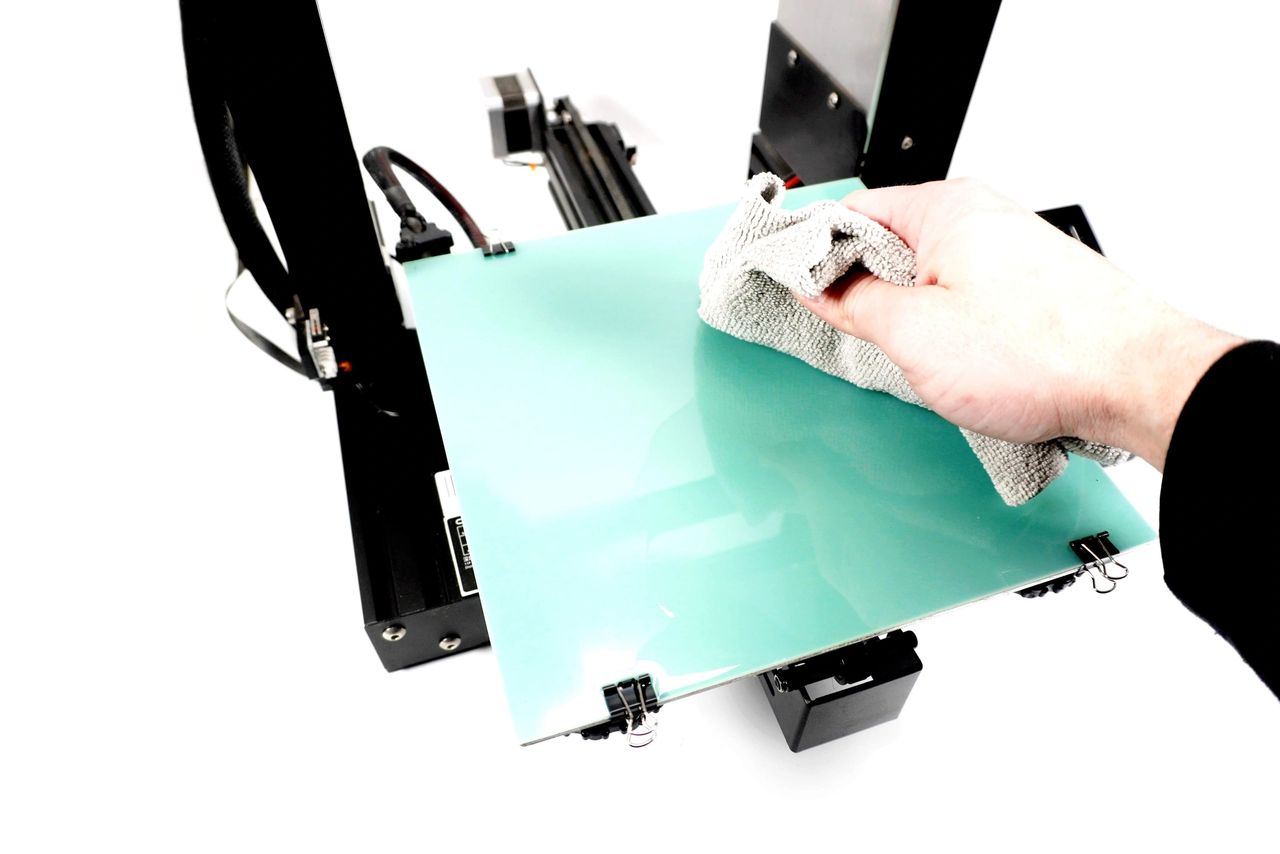
2. Clean the surface and wipe it dry.
Pour a little isopropyl alcohol on the plate and wipe down the plate using a regular cloth.
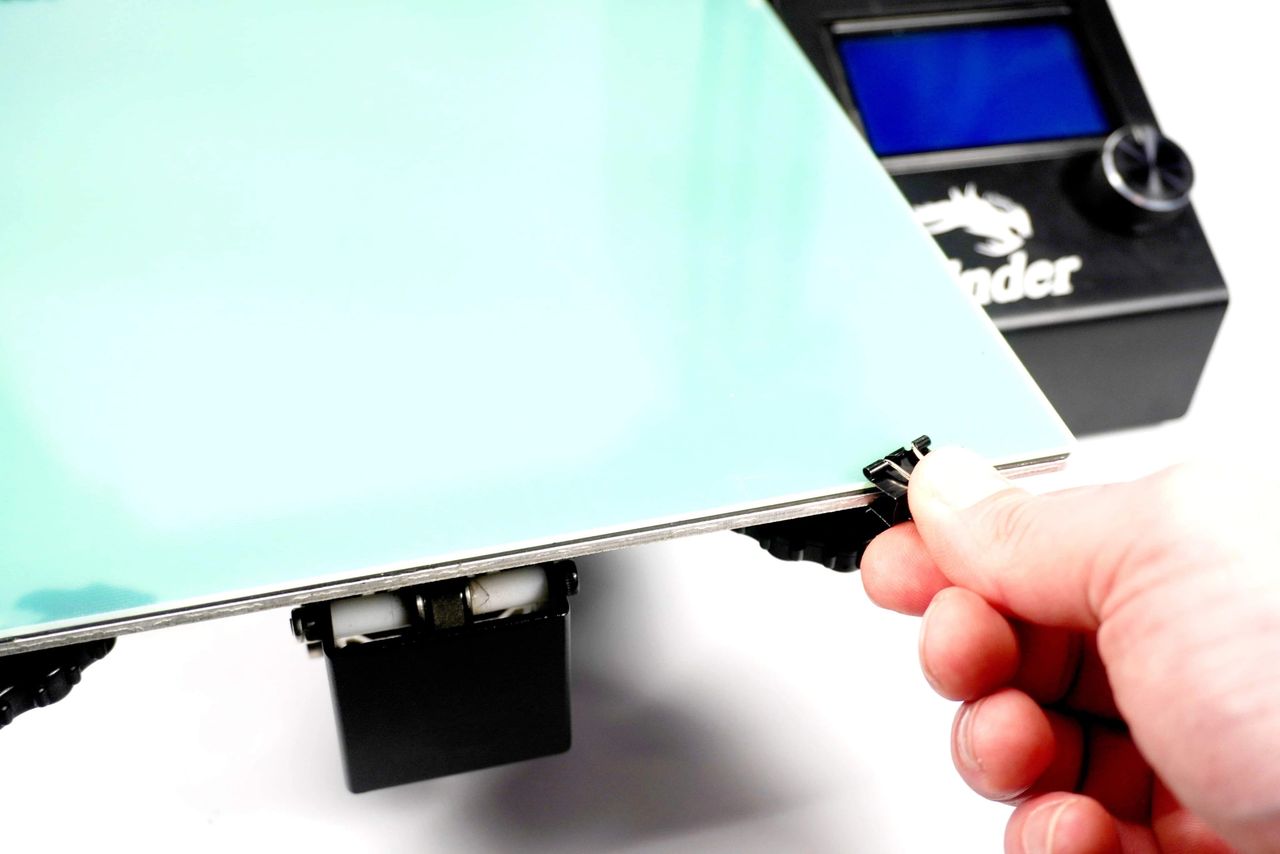
3. Lay it on the printer and clip it to align.
From the table, transfer the build plate on top of your machine’s heated bed. Since the build plate is not magnetic, manually align them together and clip it in place using small binders. Make sure to place the binders out of the nozzles’ way.
4. Clean it again using isopropyl alcohol.
Sometimes, oil from our fingers can get onto the build plate as we’re handling it. That’s why we should wipe it with alcohol for the second time to make sure it’s clean and ready to go.

5. Start printing.
Once it’s cleaned up and positioned in place, you can go ahead and start printing.
6. Remove the prints.
If you’re finished printing, most prints are able to self-release. But if necessary, you may use a scraper on our build plates. Don’t worry about scratches, they will not affect the function of the build plates.
.JPG/:/rs=w:1280)
Maintenance Tips for 3D Printers
When dealing with machines like the 3D printer, it’s inevitable to have issues here and there. That’s why we recommend doing preventive maintenance, which refers to regularly performed tasks that help keep the machine running smoothly and avoid unexpected problems.
Here are a few things to look out for:
- Clogs
Sometimes, the nozzle gets clogged and might even tend to ooze and lead to blobs and zits. Prevent this by performing a cold pull or setting the nozzle temperature as high as possible and feed through some high-temp filament. Another way to fix this problem easily with the help of a 3D Printer Extruder Filament Declogging & Cleaning Tool.
- Dust Accumulation
This is very common and can be prevented with some light cleaning and inspecting. Not doing this regularly can also lead to impairment of movement, electronic malfunction, and vibrations and ringing.
- Nozzle Care or Replacement
The nozzle is considered one of the most important parts of your printer, but still people tend to overlook it until it gets clogged or needs replacement. That said, make sure it’s always clean. You can do this by heating it up and getting rid of all the melted plastic that accumulated over time using a wire brush.
- Axis and Guide Check
To ensure smooth and precise motion and improve overall print quality, make sure to regularly check the linear guides. If you suspect any issue, the best solution is to select the right lubricant, preferably one that your manufacturer recommends and use it to avoid excessive noise, layer lines on the print, and overheating of stepper motors.
- Belt Tension Alignment
Avoid any issues as your printer starts to print! Before starting, check the belts and make sure the tension is just right. If it’s too loose, the belt may slack or skip teeth and it might not respond well to changes in speed and direction. If it’s too light, it will put more stress on the motors and lead to overheating.
- Calibration
One way to know if the calibration is good is to do a sample print like the XYZ calibration cube. This allows you to check bed adhesion, surface quality, and whatever needs to be adjusted.
If you want to learn more and do an in-depth preventive maintenance on your 3D printers, check out this helpful blog article from All3DP!